Tuesday, August 20, 2019
SUMMER BEACH HUT PAPER MACHE CRAFT
CARDBOARD IS GREAT FOR MAKING CRAFTS OF ALL KINDS. I LIKE IT COVERED WITH A LAYER OF PAPER MACHE TO SMOOTH OUT ALL EDGES, ADD A BIT OF STRENGTH, AND MAKE A NICE PAINTING SURFACE BUT YOU CAN LEAVE CARDBOARD AS IS AND PAINT IT.
YOU CAN USE CARDBOARD SCRAPS OR IF YOU PREFER YOU CAN USE BOXES. FOR THIS HUT A 6X6X6 BOX WAS USED WHICH WAS CUT IN HALF SO THAT 2 HUTS COULD BE MADE. YOU CAN MAKE YOUR HUT ANY SIZE YOU LIKE, EVEN EXTRA LARGE! THE ROOF IS MADE FROM A PIECE OF CARDBOARD CUT TO FIT. CRAFT STICKS FROM THE CRAFT STORE WERE USED FOR THE POLES BUT YOU CAN ALSO USE ACTUAL TWIGS OR BRANCHES.
1. CUT HUT BASE FROM A BOX OR PIECES OF CARDBOARD, ANY SIZE YOU LIKE. OURS IS 6X6 AND SIDES ARE 3' HIGH. CUT A DOOR OPENING AND POKE HOLES IN CORNER OF HUT FLOOR FOR YOUR STICKS. POKE STICKS THROUGH AND GLUE THEM TO CORNERS WITH HOT GLUE GUN OR REGULAR GLUE. CUT THE ROOF RECTANGLE PIECE TO FIT HUT, SCORE AND FOLD DOWN CENTER. CUT 2 SMALL TRIANGLES TO FIT INSIDE THE ROOF WHEN IT IS IN THE CORRECT POSITION, TO REINFORCE IT AND MAKE IT STAY IN POSITION.
2. LADDER IS CUT FROM CARDBOARD SCRAPS. SEE PICTURE. MAKE A PATTERN FOR PALM TREES AND SURFBOARDS, TRACE AND CUT.
3. USING LIQUID STARCH OR WHATEVER YOU PREFER, TEAR SOME NEWSPAPER STRIPS AND COVER THE HUT AND AND ALL PIECES. TREE AND SURFBOARDS ARE A LITTLE TEDIOUS SO KIDS CAN USE HELP IF MAKING HUT ON THEIR OWN. WHEN ALL PIECES ARE DRY, PAINT WITH A COAT OF WHITE ACRYLIC PAINT OR GESSO.
4. HUT IS READY TO PAINT. ACRYLICS WORK BEST AND THE LITTLE JARS FROM THE CRAFT STORE ARE PERFECT. YOU CAN USE TEMPERA OR POSTER PAINT BUT THEY ARE A BIT CHALKY. WHEN PAINT IS DRY YOU CAN ADD A COAT OF CLEAR ACRYLIC GLOSS COAT. IT LOOKS GREAT AND MAKES PIECE A BIT STRONGER.
5. KIDS CAN ADD MORE THINGS TO THEIR HUT IF THEY CHOOSE, LIKE FLAGS, AND CLOTHES LINES WITH LITTLE BATHING SUITS AND BEACH TOWELS. HUT CAN BE PAINTED IN A FOLK ART STYLE WITH SUNS AND CLOUDS AND FISH OR WITH DIFFERENT PATTERNS.
Tuesday, February 12, 2019
Tuesday, February 5, 2019
Sunday, February 3, 2019
littleislandartdepartment.blogspot.com: VALENTINE CRAFT FOR KIDS (ADULTS TOO)EASY, LARGE S...
littleislandartdepartment.blogspot.com: VALENTINE CRAFT FOR KIDS (ADULTS TOO)EASY, LARGE S...: VALENTINE CRAFT FOR KIDS (ADULTS TOO) EASY, LARGE SIZE (24") PAPER MACHE VALENTINE FOR FRONT DOOR OR WHEREVER NEEDED. THIS IS AN ES...
littleislandartdepartment.blogspot.com: VALENTINE HEART A big paper mache heart with a spe...
littleislandartdepartment.blogspot.com: VALENTINE HEART A big paper mache heart with a spe...: VALENTINE HEART A big paper mache heart with a special place for valentine goodies ~ cards, candies, and other good things. Larg...
VALENTINES
Roofing tin (flashing) is inexpensive (hardware stores) and has a great look. Spray painted with red high gloss paint, hearts can be painted and or decorated. After painting and or decorating, hearts are durable enough to hang outdoors. For kids, adults can cut hearts (with scissors or tin snips) in a variety of sizes and then paint with high gloss red spray paint.
Great stuff for decorating can be found at 99 cent stores such as beads, jewels, ribbon, stickers or anything festive like the "love" sign. Fun to do in a group or to give to kids who are spending time in the hospital or are unable to be active. Just bring painted hearts, acrylic paints, glitter, and ribbon or wire.
Materials
Roll of roofing tin (flashing) from hardware store or Home Depot. Buy a small roll to start with (unless you know you are making lots of large size hearts) and buy the lightest weight they carry (0.010 thick).
Bright red high gloss spray paint.
Acrylic paints in assorted colors, paint brushes, glue, thin wire or ribbon or string or twine, small hole punch, sand paper and if decorating hearts, any items you may want to use such as glitter, beads, gems, stickers, etc. If you like the "love" sign but can't find one at a 99 cent or craft store, you can make one out of aluminum wire, 18 guage. Spray paint red.
Instructions
Decide on size hearts you would like to decorate and cut out some patterns for tracing. I always use newspaper for patterns. Trace hearts on your flashing. The flashing is a little hard to handle when it comes off the roll as it wants to stay curled so you have to bend it just a bit to make is flatter. Don't force it too much or you will end up with dents. Trace hearts on tin and cut with tin snips or scissors. Sand the edges a bit. Edges will still be a bit sharp so when working with kids, remind them not to run their fingers along the edges.
Lay hearts out on some newspaper or drop cloth and spray red. Wait till dry, turn over, and spray the other side. Only spray one side if you plan on hanging hearts where just one side will show.
When dry, hearts are ready to paint and or decorate. If you are hanging hearts in a row as shown in samples, you will need to punch holes in tops and or bottoms. Attach hearts together with wire or ribbon or string. Have fun!
Wednesday, December 19, 2018
EASY CHRISTMAS CRAFTS FOR KIDS ~
Wreaths and Christmas Trees
Simple fun craft projects that are easy for kids and work well for a group or party. Adults will need to do a little work to get things ready but these holiday crafts keep kids busy and they love them.
PINE CONE TREES ~
Collect or buy medium size (or any size you like) pine cones (amount you will need) and spray them with glossy red and green paint.
Make little stands (about 1"x1") out of scrap wood or dowels and glue to base of pine cones with hot glue gun. If you don't have a saw, you can use cardboard tubes instead or even cut pieces of cardboard. You may have to remove some pieces from the pine cone bottoms here and there to even it out.
Make or buy stars for tree tops and glue to trees with hot glue gun. I cut up a garland of silver stars I found at the 99 Cent store which is a great place for finding craft supplies (actually decorations) especially at holiday times. You can also make stars out of poster board and add glitter.
Search craft stores, 99 Cent stores and fabric stores for supplies and trims kids can drape and glue to their tree. Put them out in plates and bowls for kids to choose from. I buy the large bags (variety of sizes) of pom poms from Oriental Trading. I use them year round because kids love them.
WREATHS ~
Buy or make wreaths. I found a few different kinds of wreaths at the 99 Cent store (including the snowflake) and I made a few out of garland (cut and wired together) also from the 99 Cent store.
Cut mittens (5" or so) out of white card stock for kids to decorate and hang on their wreaths along with a piece (8" or so) of thin wire to attach them together and then to the wreath.
Cut a variety of trims (ribbons, zig zag trim etc) along with pom poms, stars and any good things you can find to glue on mittens. Provide markers as well so kids can draw designs on their mittens if they choose, or combine with trim.
For decorations to glue on the wreath, use large size pom poms and any fun items you can find or make like stars and snowflakes. I found the snowflake trim at the 99 Cent store and cut it apart.
I usually put tacky glue in little cups or paper plates and provide sticks as it works better than glue bottles and tacky glue works better than school glue.
Tuesday, December 4, 2018
Twig Christmas Trees
Easy craft to do with kids, lots of creative possibilities ~ paint, decorate, add ornaments, glitter, trims, yarn, or leave natural.
Collect twigs with kids or have them do the collecting. If none are close by you can always go to a park. Arrange twigs in tree shapes and zap corners with a glue gun (adults should do this part) to attach. Add cross pieces. Cut stars out of lightweight cardboard, tag board or poster board, glue to a small twig, and then to tree top. These trees are delicate and will need to be hung on a wall or door. They look great in a group or row or alone. They can be left natural or decorated. Some ideas include paint, glitter, little tied on ornaments (such as the little cut out watercolor houses shown), trims, yarn draped on the cross pieces, loops of colored paper and anything you can think of.Monday, October 29, 2018
HAUNTED HOUSE POP-UP
Three D Haunted House craft is easy and fun for all kids, all ages. You can provide all cut outs for younger kids or those who need more help and encourage older kids to cut out their own shapes and add their own creative touches.
You will need some black railroad board or heavy construction paper or poster board for your basic house, and some good Halloween colors for windows, doors, moon, pumpkins etc as well as a black marker, glue, and scissors. Optional glitter.
You can make house any size and any sort of funky roof design you like. For balance, it is best to have 2 tall roof sides and then 2 shorter straight sides (as shown in picture). You can have kids help out with designing the house. It will be crooked so no need to try and make a perfect design. The main idea is that you will need 4 sides of appx same width (ours is 4"). You will measure and score the sides before kids glue on their decorations so they won't glue things over the seams as the seams will be your fold lines when assembling the house. I like to make patterns out of newspaper because I like to have a pattern and newspaper has helpful lines. Look over the pictures below to see how our pattern was done.
After cutting out the house, cut out lots of Halloween shapes like pumpkins, bats, windows, doors, ghosts, a big crooked tree, a moon, a black cat, and anything else you can think of. Kids will glue the items on the house while it is flat, leaving the seam lines free. They can add details with marker and then, if you choose, some glitter here and there. After glue is dry, house can be folded and glued together along the tab.
Wednesday, October 24, 2018
HALLOWEEN WITCH ~ PAPER CRAFT
PAPER WITCHES ARE CREATIVE, FUN AND EASY. KIDS CAN CUT AND DECORATE THEIR WITCH ON THEIR OWN OR YOU CAN HELP THEM GET STARTED BY PROVIDING THEM WITH THE BASIC WITCH ALREADY CUT, GLUED AND READY TO PAINT AND SPRINKLE WITH GLITTER. FOR BASIC INSTRUCTIONS SEE HALLOWEEN PAPER CRAFTS, SEPTEMBER 27, 2017.Tuesday, September 25, 2018
Easy Fall Sign
A fun and easy Fall craft for kids of all ages. Also a great way for kids to enjoy the beauty of watercolors and a simple method that always works. You will cut leaves out of watercolor paper, provide kids with Fall watercolors (tube paints work great) , instruct them to put water on paper first, and then add dabs of colors here and there, letting them run together. Fall colors are "friends" so always look good together. After all pieces are glued or tied to sign, hang on the door!
Materials ~
Piece of cardboard, jagged cut ends, holes in top for hanging string or jute. Sign can be any size, we used 4X9. Plus a piece of jute or string for hanging. Hole for large leaf on bottom edge. Or more if you want to add more leaves. You can use string to tie on hanging leaf or clear fishing line/thread if you have it.
Fall letters cut out of colored paper and some leaves cut out of watercolor paper (there are patterns online if you need them). You can do a few smaller leaves for top and one large as we did or you can do lots of leaves, anything goes.
A few tubes of watercolors in Fall colors such as red, yellow, and purple. More colors can be mixed from these. If you have a paint box set, that will work too.
Glue for letters and leaves.
Tuesday, September 11, 2018
Tuesday, July 17, 2018
Thursday, March 29, 2018
EASTER EGGS
EASY PAPER MACHE EGGS FOR ALL AGES ~
Easter eggs are created out of balloons and paper mache. The large eggs are from 20" balloons but are not blown up all the way, just far enough to get the egg shape, about 12". 10" balloons make a nice size egg for kids.
Materials ~
Assorted balloons in different sizes, 8", 10", 12", 20", masking tape, torn newspaper strips, liquid starch for paper mache (or any paper mache recipe you like). Gesso or any white acrylic paint for base coat, assorted acrylic colors plus white for mixing, paint brushes, assorted sizes.
For younger kids you can pre paint eggs in bright colors and give them sticky back foam shapes to stick on their egg (photos 2 and 3). This works great for really young kids and for kids who are in the hospital or clinic as it is fun, easy and very neat. For kids old enough to cut out their own shapes you can give them some extra foam and scissors.
Paper Mache tips ~
Blow up some assorted sizes of balloons and stretch them a bit before blowing to help give them more of an egg shape. You may have to try a few as some may be too round. Use masking tape and tape down the balloon knot.
To make eggs strong and smooth it's best to do 3 layers of paper mache and let each layer dry before applying the next. This can take a few days (due to drying time) but it's worth it as eggs will be strong and smooth. It just doesn't work as well trying to do 3 layers all at once. Sometimes the balloon collapses or egg gets lumpy.
Painting ~
When eggs are dry, paint a coat of white paint for undercoat, I prefer Gesso but white acrylic paint works too. You can paint eggs one solid color to start or just dive in and paint any way you like. You can paint stripes of color (as shown in first picture) and then paint different designs in each stripe. Try patterns like leaves, swirls and flowers. Starting with big stripes can also be good for older kids as it gives them a place to start and a great big blank egg can be daunting.
FUN FOR ALL AGES!
Wednesday, February 21, 2018
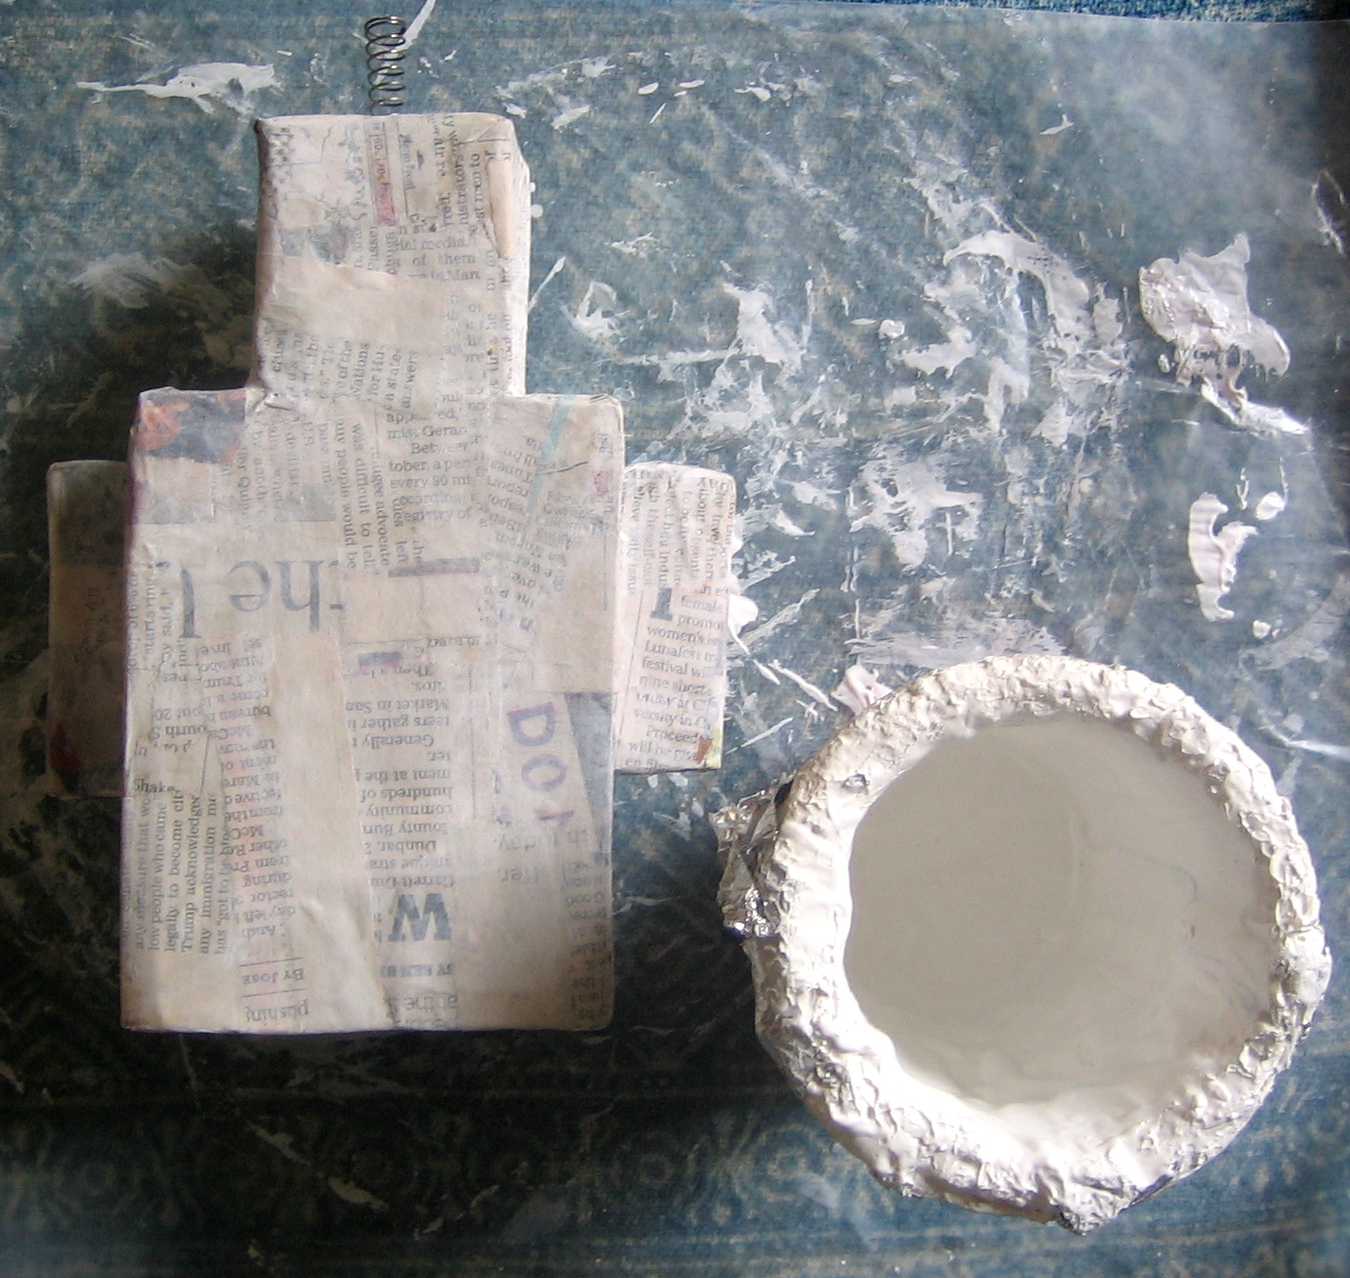
ROBOTS ~ PAPER MACHE
Simple Robots created out of cardboard boxes, pieces of cardboard, some springs and paper mache. Robots can be just about any size, from 4 or 5 inches to a few feet high. After cardboard is taped together, robot is covered with a layer or two of paper mache, a coat of Gesso or white base paint, and it's ready for painting. A fun craft for all ages.
Materials
Cardboard boxes, pieces of cardboard, scissors, masking tape, liquid starch and torn newspaper strips, little springs and or wire, Gesso and assorted acrylic paints and brush.
This robot is about 8 inches high and is made with a box for the main body, a smaller box for the head and 2 pieces of folded cardboard for arms. A little spring was poked into the top of the head but you can also use a piece of coiled wire.
After boxes and cardboard are taped together, cover with a layer or two of paper mache. I prefer liquid starch and torm newspaper strips. Liquid starch is only sold at a few select markets like Stater Brothers but you can use any paper mache recipe you like.
After paper mache is dry, paint a coat of Gesso (or any white acrylic paint) so robot will be nice and bright for painting.
I prefer acrylic paints for paper mache projects as it covers really well. The little inexpensive bottles sold at craft stores work great. Let kids pick out the colors they like and encourage them to paint their robots any way they choose. You can use a clear acrylic top coat for a nice shiny finish which is not necessary but looks great and makes objects a little stronger.
Small cardboard robots are fun and easy to take to kids spending time in the hospital for example. But be sure to try creating other sizes and even extra large ones made from large boxes. You can also cut face pieces and "controls" out of pieces of cardboard and glue them on your robot. Keep it super simple or make it detailed, lots of possibilities.
Sunday, December 10, 2017
HOLIDAY CRAFTS ~ EASY AND FUN
GREAT PROJECTS FOR GROUPS AND CLASSES, ESPECIALLY FOR YOUNG KIDS. SNOWMAN ~
Basic Snowman is made out of cardboard discs (called baking drums and circles) used for baked goods. Discs can be purchased at a craft store but if you are needing a large quantity, they are much less expensive when purchased from a paper supply company like Paper Mart (online and Amazon shop). They are sold in packs of 50 and come in different sizes, from 6" to 14". For this project I used 6" and 9".Once you have your basic snowmen you can decide if kids will be doing the very basics (sticking on pre-cut pieces) of they will be creating features with paper and or fabric and glue, markers or paint. If I am working with a large group of kids in limited space I go for the basics and have everything organized and ready for kids to peel and stick. For this group I had snowmen pre-glued together with hot glue gun and also cut and glued on the hats but kids can also do this part themselves and hats can be any type of hat such as snow hats etc.
Instructions and materials listed here will be more for the large group but if you are working with just a few kids or want to give kids more room for creativity, just give them the basic snow man along with a variety of materials such as markers, paint, fabric or colored paper for scarf, hat and mittens. You can get more creative by adding stars, snow, a little tree, some lights, candy canes, stickers or whatever works.
MATERIALS ~
White bakery circles, 2 sizes, amount you need.
Hot glue gun
Black railroad board or heavy poster board for hats.
Black peel and stick felt sheets for eyes, mouth and buttons. (sticky back foam sheets can also work)
Orange peel and stick felt for nose. (foam sheets also work).
Assorted colors of construction paper for mittens or white if kids are going to be creating their own designs on the mittens with markers. If you want to make it super easy and not use glue at all, cut mittens out of sticky back felt or foam in assorted colors. For mittens it is less expensive to use colored paper but both work.
Red fabric (fleece) for scarf or any fabric you like. Mittens can be cut from this fabric if you choose as well.
DIRECTIONS ~
With hot glue gun, glue discs together overlapping just an inch or so.
Cut a piece for hat ( mine is 6.5" high by 6" wide and is for the 6" disc) any size you like, and a strip for the rim. Glue rim to hat and glue hat to snow man.
Cut out little squares (appx 1/2") from the black felt for the face and buttons (as many as needed). It is easiest to cut 1/2" strips first, then squares, as many layers as you can do at a time.
Cut noses out of orange felt, mitten shapes, and scarves (mine are about 30"x2".
If kids will be using glue for their mittens, you can put some in a few paper plates with some sticks as this works a lot easier than bottles and glue sticks don;t always work.
Put everything out for kids and have fun. If you need to keep it really simple make little packs with all materials for each child.
Wednesday, December 6, 2017
Friday, November 17, 2017
THANKSGIVING CRAFTS
Signs and Turkeys
Thanksgiving signs are easy to make and you can do any number of variations. Start with a piece of cardboard, any size you like (I used a 10 x 12 square) and paint with a few coats of chalkboard paint. Kids can then use chalk to write any message they choose on their signs which is always fun for them and if necessary they can erase and start over or change messages.
For leaves and turkey I used watercolor paper and some colored paper for turkey body and head. Kids can paint the leaves and turkey feathers any way they like or they can even use markers or crayons.
Copy the turkey and leaf shapes from the picture or make your own, cut and glue to cardboard chalkboard and it's ready to paint. Kids or helper can then paint a message and it's ready to hang up.
PINE CONE TURKEYS
All kids love making pine cone turkeys because they look so adorable and they are so easy.
Helper will glue a walnut head on first with a glue gun (to make sure it sticks) and then eyes, beak and red piece.
Give kids a bunch of colored feathers (from craft store) and a bit of glue to dip end of feather into just to make sure they stay in place. For more about pine cone turkeys see November 2016 in this blog.
Subscribe to:
Posts (Atom)


