Friday, February 24, 2017
WATERCOLOR PAINTING PACK ~ MERMAIDS, CASTLES, AND UNICORNS
Watercolor Painting Pack contains all supplies needed for an easy, fun, watercolor painting experience, for kids and adults. Six different designs are pre printed on fine quality 140 lb watercolor paper along with a 12 color set of fine quality semi moist watercolors from Jack Richeson and 2 brushes.
Watercolor painting can be done in several ways, in the lines or outside the lines, wild and free. The lines will show through so anything goes. Tips are included as well as an extra sheet of watercolor paper for practicing and experimenting.
Watercolor Painting Packs are available at etsy.com/shops/littleislandcompany
Saturday, February 11, 2017
VALENTINE HEART
A big paper mache heart with a special place for valentine goodies ~ cards, candies, and other good things.
Large paper mach heart with slot for goodies is about 21" across and is similar to the large paper mache kid's heart project below. You can follow the tips and instructions for the Kids Heart project with a few adjustments and additions. The basic instructions as to how to mark and cut heart out of cardboard are the same as are the instructions for paper mache. Following are the changes for the beautiful and welcoming front door heart.
After you mark and cut the basic heart you will also mark and cut a second piece which will be attached to the first piece, creating the front slot for goodies.
After marking and cutting the first heart (our is 21") you will mark and cut a second piece after cutting off the top portion (about 7") so you will have a heart piece minus it's top. You will also need a side piece of cardboard about 1" wide and 30" long, or long enough to fit front piece to back (as the side ). You will work this piece with your hands a bit to make it curve, bending as you go. Cardboard is great this way as it is so easy to use and the paper mache covers up any bumps and imperfections.
Same as it is for the first heart project you will cover your heart and heart front piece with paper mache. You will not be putting them together yet, that won't happen until both hearts are dry. After they are dry (don't forget to use weights to keep them flat while drying on wax paper), you will tape the long side piece in place joining both heart pieces together. After side piece is taped in place, you will paper mache the sides and ends. To keep the heart in shape and so top won't sag in a bit, you can stuff a little newpaper in the slot while sides are drying. After the sides are dry, paint the entire piece with Gesso (or any white acrylic paint, even house paint) and after that is dry, you are ready to paint your design.
Have fun with your design. You can copy the sample or do whatever you like. I love folk art and I usually end up with a folk art look to my projects. I don't like to worry about my design being too balanced and perfect so I just dive in and see where it goes. I start with simple shapes, lines, etc and then just keep adding more designs and details. Acrylics make it easy to keep adding more paint to your designs and as a last step it's easy to add more hearts and flowers or white dots and lines here and there for extra pop.
Finish with a clear acrylic top coat and a hanging wire. Hang on your front door and hope for the best. At the very least it will make people smile and that's always a good thing.
Monday, January 30, 2017
VALENTINE CRAFT FOR KIDS (ADULTS TOO)
EASY, LARGE SIZE (24") PAPER MACHE VALENTINE FOR FRONT DOOR OR WHEREVER NEEDED. THIS IS AN ESPECIALLY FUN PROJECT TO DO WITH 2 OR 3 KIDS AS THEY CAN EACH PAINT THEIR OWN SECTION AND IT ALWAYS WORKS AS COLOR CHOICES ARE LIMITED.
MATERIALS ~
LARGE PIECE OF CARDBOARD, PURCHASED IN SHEETS FROM ART SUPPLY/FRAMER/JANITORIAL SUPPLY OR A LARGE BOX AT LEAST 24" ACROSS.
A HEART PATTERN, 24" ACROSS. EASIEST WAY TO MAKE PATTERNS IS WITH NEWSPAPER. FOLD, DRAW, AND CUT. TRACE ON CARDBOARD.
LIQUID STARCH OR ANOTHER PAPER MACHE MEDIUM. I PREFER STARCH AND YOU CAN FIND IT AT SMART AND FINAL OR LARGE MARKETS. TORN NEWSPAPER STRIPS.
GESSO OR ANOTHER WHITE ACRYLIC PAINT FOR BASE.
ASSORTED ACRYLIC PAINTS, RED, AND OTHER COLORS YOU CHOOSE SUCH AS PINK, MAGENTA, PURPLE, YELLOW, WHITE, AND ORANGE.
WIRE FOR HANGING, AND CLEAR GLOSS ACRYLIC SPRAY OR LIQUID FOR A SHINY TOP COAT.
WHEN HEART IS DRY, PAINT WHITE. YOU CAN PAINT DIRECTLY ON THE NEWSPAPER BUT I FIND COLORS ARE BRIGHTER WHEN PAPER MACHE IS PAINTED WHITE. I PREFER GESSO FOR THE WAY IT COVERS BUT A WHITE ACRYLIC WILL DO OR EVEN WHITE HOUSE PAINT, WATER BASE.
AT THIS POINT YOU CAN EITHER PAINT YOUR HEART ONE COLOR, SUCH AS RED, AS I DID OR YOU CAN PAINT IT ANY WAY YOU CHOOSE. FOR THE KIDS I FELT A RED BACKGROUND WAS A GOOD PLACE TO START AS I KNEW IT WOULD TIE EVERYTHING TOGETHER AND IT WOULD MAKE IT EASY FOR THEM TO ADD THEIR OWN DESIGNS.
PUT AN ASSORTMENT OF COLORS ON A FEW PAPER PLATES, YOU WON'T NEED A LOT. I USE THE ACRYLIC CRAFT PAINTS IN THE SMALL 2 OUNCE BOTTLES SOLD AT CRAFT STORES. I CHOSE PURPLE, ORANGE, MAGENTA, WHITE, AND YELLOW AS I THINK THEY WORK WELL TOGETHER ON RED. I TOLD THE KIDS THEY EACH HAD 1/3 OF THE HEART TO PAINT THEIR OWN DESIGN AND I SUGGESTED, DOTS, HEARTS, "LOVE", LINES, ANY DESIGN OR PATTERN THEY WANTED. WITH KIDS, JUST A FEW SUGGESTIONS HELPS THEM GET STARTED AND THEY ARE ALWAYS OPEN TO A LITTLE HELP.
AFTER HEART IS DRY, ADD THE SHINY TOP COAT AND HANGING WIRE.
Saturday, January 14, 2017
VALENTINE CARDS PAINT PACK
VALENTINE CARDS PAINT PACK CONTAINS 12 PRE-PRINTED CARDS (FLAT, 4X5) WITH ENVELOPES, A 12 COLOR SET OF JACK RICHESON SEMI MOIST FINE QUALITY WATERCOLOR PAINTS, PAINT BRUSH, SMALL PACK OF RED GLITTER, AND A FEW HELPFUL TIPS.
CARDS COME IN 6 DIFFERENT ORIGINAL, HAPPY, DESIGNS (2 OF EACH) PRINTED ON FINE QUALITY 140 LB WEIGHT WATERCOLOR PAPER. PACK IS SUITABLE FOR KIDS (5 AND UP) AND ADULTS. RED GLITTER IS INCLUDED FOR ADDING A SPARKLE HERE AND THERE.
PRE-PRINTED PAPERS ARE FUN TO PAINT AND GOOD PRACTICE FOR DOING YOUR OWN. KIDS SHOULD BE ENCOURAGED TO PAINT THEIR CARDS ANY WAY THEY CHOOSE AND "STAYING IN THE LINES" IS NOT A REQUIREMENT. LINES WILL STILL SHOW UP IF PAINTED OVER. IT'S NICE TO GET KIDS FAMILIAR WITH WATERCOLORS STARTING AT A YOUNG AGE AND PRE-PRINTED PAGES (OR CARDS) ARE A GOOD WAY TO START.
Wednesday, January 11, 2017
PAPER MACHE CAT
PAPER MACHE CAT IS AN EASY FUN ART PROJECT FOR KIDS OR ADULTS. THIS IS A GREAT PROJECT FOR KIDS SPENDING QUIET TIME AT HOME, IN THE HOSPITAL OR CLINIC AS I HAVE FOUND MOST KIDS ENJOY PAINTING PAPER MACHE OBJECTS THAT HAVE BEEN CREATED FOR THEM AND FOR MOST, IT'S SOMETHING NEW. IT'S ALSO A CHANGE FROM PAINTING OR DRAWING ON PAPER. KIDS TYPICALLY LIKE CATS OR DOGS, OR BOTH, AND IT'S FUN FOR THEM TO PAINT THEIR ANIMAL ANY COLORS OR DESIGNS THEY CHOOSE. IT'S ALSO FUN THAT IT'S A BOX FOR "STUFF" AS WELL. KIDS CAN ALSO DO THE PAPER MACHE PART OF THE PROJECT, ESPECIALLY IF THERE ARE NO TIME RESTRICTIONS. IN THIS CASE I CREATED CATS FOR KIDS TO PAINT AS THE KIDS I WORK WITH HAVE A LIMITED AMOUNT OF TIME AND PAPER MACHE HAS A LONG DRYING TIME (ABOUT A DAY). YOUNGER KIDS PREFER ADULT ASSISTANCE AS IT TAKES PRACTICE AND CAN BE A LITTLE TOO TEDIOUS FOR THEM. THIS PROJECT, PRESENTED READY TO PAINT IS A GREAT GIFT FOR A CHILD.MATERIALS AND SUPPLIES REQUIRED ~
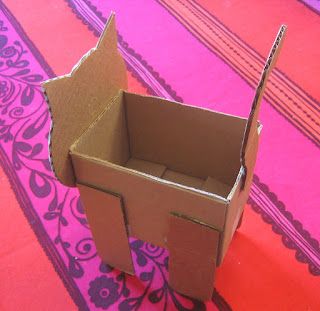
CAT IS MADE FROM CORREGATED CARDBOARD. BODY IS A BOX (I USED 4X4X6 BUT ANY SIZE RECTANGLE YOU PREFER WILL WORK). IF YOU DON'T HAVE A BOX YOU CAN ALSO CUT YOUR BODY SHAPE OUT OF FLAT CARDBOARD, A CENTER BOTTOM, 2 ENDS AND 2 SIDES. CIRCLE USED IS A CARDBOARD CAKE PLATE (8") FROM ART STORE BUT YOU CAN ALSO CUT YOUR OWN. EXTRA CARDBOARD WHICH CAN BE PURCHASED OR YOU CAN RECYCLE A BOX.
SHARP KNIFE OR SCISSORS FOR CUTTING CARDBOARD
GLUE FOR ATTACHING CAT PARTS
LIQUID STARCH FOR PAPER MACHE (FOUND AT LARGER MARKETS OR SMART AND FINAL) OR A RECIPE YOU PREFER. I LIKE LIQUID STARCH AS IT IS EASY AND DRIES CRISP AND STRONG. TORN NEWSPAPER STRIPS
ACRYLIC PAINTS IN ASSORTED PREFERRED COLORS. I USE THE 2 OUNCE BOTTLES FROM ARTS AND CRAFTS STORES AS THEY ARE INEXPENSIVE AND ARE A GOOD CONSISTENCY FOR PAPER MACHE BUT ANY ACRYLICS WILL DO. YOU CAN ALSO USE TEMPERA PAINTS BUT I PREFER THE LOOK OF ACRYLICS. FOR A NICE SHINY FINISH THAT ALSO MAKES YOUR PIECE STRONGER, ADD A TOP COAT OF CLEAR ACRYLIC GLOSS MEDIUM..
FOLD AND TAPE BOX BOTTOM AND CUT OFF TOP TABS OF BOX AS IT WILL BE OPEN. MARK A 5.5" CIRCLE IN YOUR CIRCLE PIECE (OR MARK AND CUT A CIRCLE WITH EARS OUT OF CARDBOARD) FOR CATS HEAD, DRAW 2 EARS, AND CUT. MARK AND CUT 4 LEGS ABOUT 6" LONG (NOT TOO SHORT AS YOU NEED SOME OVERLAPPING ON BODY FOR STRENGTH) EACH BY ABOUT 2" WIDE, ROUND CORNERS A BIT AT BOTTOM EDGES. DRAW AND CUT A TAIL AND A NOSE. GLUE ALL PIECES TO BOX AS SHOWN IN PHOTO. REMEMBER CAT CAN BE ANY SIZE YOU CHOOSE, AND EVEN LEGS, EARS ETC CAN VARY IN SIZE.
TEAR UP SEVERAL STRIPS OF NEWSPAPER AND PUT SOME STARCH IN A SHALLOW PAN OR DISH. DIP PAPER STRIPS INTO STARCH AND SQUEEGEE WITH FINGERS AND COVER CAT. ONE COAT IS FINE BUT IF YOU WANT IT TO BE STRONGER YOU CAN ADD A SECOND COAT. IF YOU ADD A SECOND COAT, IT''S BEST TO WAIT UNTIL THE FIRST COAT IS DRY SO IT DOES NOT WRINKLE TOO MUCH. TRY AND MAKE YOUR STRIPS AS SMOOTH AS POSSIBLY WHEN APPLYING TO CAT AS IT WILL BE EASIER TO PAINT AND WILL LOOK SUPER WHEN FINISHED. SOMETIMES PEOPLE ASK WHAT PAPER MACHE ITEMS ARE MADE OF AS THEY LOOK SO GOOD!
WHEN PAPER MACHE IS DRY, ADD A COAT OF GESSO TO PROVIDE A NICE CLEAN PAINTING SURFACE. YOU CAN PAINT ON THE NEWSPAPER BUT IT'S MUCH EASIER, AND COLORS ARE MUCH BRIGHTER ON WHITE. I PREFER GESSO FOR THE WAY IT COVERS BUT YOU CAN ALSO USE A WHITE HOUSE PAINT OR ACRYLIC. WHEN DRY CAT IS READY TO PAINT. IF THIS IS FOR A CHILD ASK THEM WHAT COLORS THEY WOULD LIKE AND ENCOURAGE THEM TO HAVE FUN AND MAKE THEIR CAT ANY COLORS THEY CHOOSE. YOU CAN MAKE A LITTLE PALETTE ON A PAPER PLATE.
A GOOD PAINTING TIP FOR KIDS ~ ACRYLICS DRY FAIRLY FAST, AFTER DRY, COLORS CAN BE ADDED TO COLORS, EVEN WHITE ON BLACK. A GOOD IDEA TO FOR KIDS TO TRY IS TO PAINT ONE COLOR FIRST AND AFTER DRY ADD SOME DESIGNS SUCH AS DOTS, STRIPES AND BLOTCHES. SAME WITH FACE, IT'S EASIER TO PAINT THE ENTIRE FACE AND THEN DO EYES, WHISKERS AND NOSE NEXT. REMIND KIDS NOT TO WATER DOWN THEIR PAINTS BUT TO USE STRAIGHT FROM THE PALETTE. AFTER PAINT IS DRY YOU CAN ADD THE TOP COAT.
Saturday, December 17, 2016
CHRISTMAS TREE CRAFT
Christmas tree craft is an easy project to make for kids and lots of fun to decorate. A great craft for groups as it can be simple for younger kids to decorate, and more complex for older kids.Kids can glue pom poms on their trees which is fun, easy and fairly neat. You can also cut circles out of glitter sticky back foam or purchase stickers such as circle shape price stickers or snowflakes. There are lots of different ways to decorate trees, you can glue on different fancy trims and ribbons, or make different size circles to fit over a tree formed out of pipe cleaners or trims, create stars, apply glitter, hand made paper ornaments, and of course paint which looks great but not always easy when working with a large group. There are lots of possibilities and the only thing to keep in mind is the weight of the tree as it is not super strong. See below for materials and tips.
Blank trees, ready for kids (or adults of course) will look like these. I used found twigs for tree trunks because I like the character of the twigs and the way they are all different but you can use dowels if you prefer. Tree is basically a wooden base with 1/4" drilled hole, twig and 7" kraft paper cone painted with green acrylic paint. Leaving the tree Kraft and not painting green also looks great, especially if decorating with white and gold. This bunch of trees was for young kids so I choose to paint them green, for more kid appeal.
Materials ~
Scrap wood for base, appx 2" high, 3x3, 3x4, 4x4 etc...choose what you like.
Hot Glue or strong glue
Twigs or dowels, appx 1/4" x about 8 to 10" long
Kraft paper cones, 7 " high or size you prefer. You can make cones if you want to but I purchased these cones from Oriental Trading because they are so inexpensive. They are actually Kraft Confetti Cones...handed out for weddings etc. They are probably also sold at party supply stores.
They are not heavy but they are sturdy enough for this project. You will also be reinforcing them a bit by stuffing with crumpled up news paper or paper towels.
A cardboard circle (appx 3" across) to fit inside of tree about an inch from the bottom edge to hold newspaper and stem in place.
Green acrylic paint, tacky glue, and little sticks for kids to apply glue.
Assortment of small size Pom Poms, and glitter Pipe Cleaners for tree top star.
Cut your little wood blocks and drill hole.
Stuff some newspaper in the tree forming a little hole or opening for the tree stem as you go. Push twig or dowel in center of newspaper and work it in a bit making sure it is fairly far up in tree and as center as possible. Put a little hot glue in here and there for extra hold. Cut a cardboard circle to fit inside tree with a little hole in center for tree stem and push piece up snugly into tree to hold all in place. Add a little glue around the edge of the circle.
Put a little glue in the wood base hole for the twig stem and hold it in place a bit to make sure it is secure. You may have to trim your twig a bit to fit the hole. Add a little extra glue around the twig.
Paint tree green and trim the tree top just a tiny bit to make sure the little star will fit.
To make stars, bend pipe cleaner as shown in the picture ~ 5 little points, and 2 ends, one a bit longer. After making points, bring around to join ends, then twist the shorter end of the piece around the opposite end, leaving the longer end as it is. It will look funny but work it a bit into a star shape with the long stem straightened out, in center of bottom 2 star points. You will have to sort of push the bottom part of the star in at center, leaving long piece ready to stick in tree top. Practice.
Put some tacky glue in little plates etc for gluing pom poms. Have kids use tooth picks or any little sticks for applying glue to tree for each pom pom. This is much easier for kids than glue bottles. Stick star in tree top.
Remember, you can try lots of different ways of decorating trees, even paint which has lots of possibilities but easier to manage with older kids or just a small group.
Subscribe to:
Posts (Atom)


